Organizing your dependencies
Tending to your code eventually inevitably brings you to the topic of managing your dependencies.
There is a bunch of options available to manage your dependencies in your Swift projects today. In this post, I will focus on swift-dependencies from PointFree.
The main idea is to isolate your code from having any knowledge on the implementation details of your dependencies, i.e. have the dependency interface be as simple and opaque as possible. This usually means calling the interface with known argument types and the interface returning known types as well - not introducing new models that you then have to adapt in your module.
The general philosophy in swift-dependencies is to create lightweight interfaces for your dependencies
struct NewsClient {
    var fetchNews: () async throws -> [News]
}

...

class NewsListViewModel: ObservableObject {
    @Dependency(\.newsClient) var client

    @Published var news: [News] = []

    @MainActor
    func loadNews() async {
        do {
            self.news = try await client.fetchNews()
        } catch {
            print("Handle \(error) here")
        }
    }
}
With the above sample, the ViewModel object does not have to care about any implementation details, it’s all neatly tucked away behind a simple function call, that returns known types back to the model. The benefit of declaring return values in this fashion is the benefit of not polluting the app’s internal module with any API specific implementations, such as OpenAPI generated classes etc.
Taking separation one step further
Even though the above example is contrived and simplified, one can easily imagine a much more complex dependency, where numerous other frameworks are involved. One such example that is usually given by PointFree, is the speech to text client.
In Xcode previews and your unit tests you want to keep dependencies nimble and controlled. You also want tests and previews to build quickly. One way to achieve that is to introduce a separate library target for your live dependency. This one only gets linked into the final target executable, i.e. the App. And using the Dependencies framework, it’s all resolved automatically, if specified correctly in the beginning.
The first important step, without which this post does not make much sense, is to have your features modularized. That means, have separate packages for different features in your app. The news list above for example should be its own Swift package.
Once that’s done, it’s time to introduce a new package to the project, which defines the interface for your dependency and provides test and preview implementations. We’ll call it MyClient.
// Package.swift
products: [
    .library(
        name: "MyClient",
        targets: ["MyClient"]),
],
dependencies: [
    .package(url: "https://github.com/pointfreeco/swift-dependencies", branch: "main")
],
targets: [
    .target(
        name: "MyClient",
        dependencies: [
            .product(name: "Dependencies", package: "swift-dependencies")
        ]
    )
]

// MyClient.swift
import Dependencies

public struct MyClient {
  public init(call: @escaping () async -> Void) {
    self.call = call
  }

  public var call: () async -> Void
}

extension MyClient: TestDependencyKey {
  // value used in tests
  public static var testValue: MyClient {
    MyClient {
      print("test value")
    }
  }
  // value used in previews
  public static var previewValue: MyClient {
    MyClient {
      print("preview value")
    }
  }
}

public extension DependencyValues {
  var myClient: MyClient {
    get { self[MyClient.self] }
    set { self[MyClient.self] = newValue }
  }
}
That’s basically all there is to it. The interface is defined and now we can use this module in our features.
// Package.swift
products: [
    .library(
        name: "MyFeature",
        targets: ["MyFeature"]),
],
dependencies: [
    .package(path: "../MyClient")
],
targets: [
    .target(
        name: "MyFeature",
        dependencies: [
            .product(name: "MyClient", package: "MyClient"),
        ]
    )
]

// Feature.swift
import SwiftUI
import Dependencies
import MyClient

public class TestModel: ObservableObject {
  public init() {}

  @Dependency(\.myClient) var client

  func test() async {
    await client.call()
  }
}
With this setup, the feature, built in isolation, either for previews or tests will pull in either preview or test dependency implementations. There’s no notion of the resource heavy frameworks used for the live version, therefore the build process is fast and you still control all your dependencies.
The last step is to implement and pull in the heavyweight live implementation. Define another library target, which will depend on the dependency interface target. Let’s call this one MyClientLive and it will depend on the interface package.
// Package.swift
products: [
.library(
name: "MyClientLive",
targets: ["MyClientLive"]),
],
dependencies: [
.package(path: "../MyClient") // depend on the interface we defined earlier
// other heavyweight 3rd party dependencies go here
],
targets: [
.target(
name: "MyClientLive",
dependencies: [
.product(name: "MyClient", package: "MyClient")
]
)
]
// MyClientLive.swift
// Put all the heavy stuff in here
import Dependencies
import MyClient
extension MyClient: DependencyKey {
public static var liveValue: MyClient {
MyClient {
print("live value!")
}
}
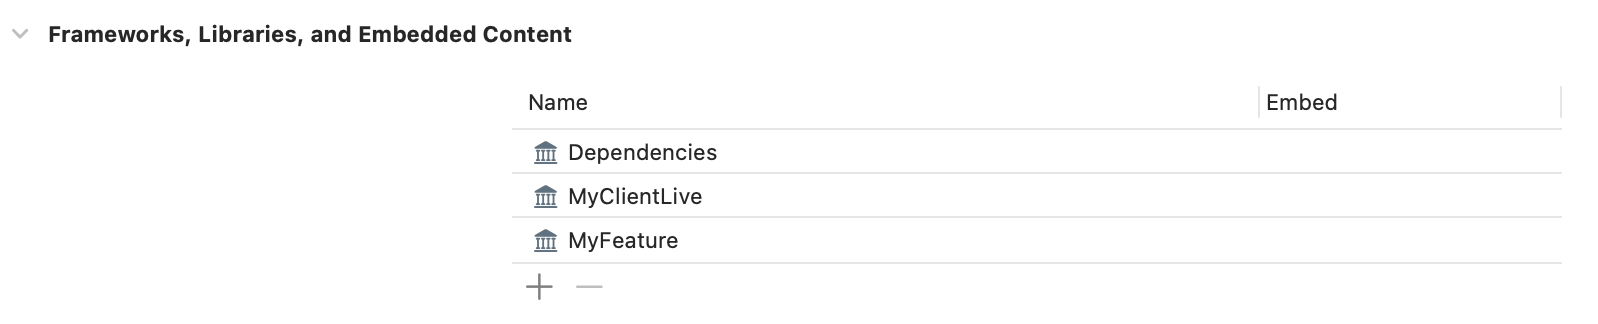
}Now for the end, it’s time to tie the live implementation to the App target. Since this cannot yet be done in Package.swift, you have to do it in Xcode, but it’s quite simple. If you have the live implementation already referenced in the project, all you have to do is to add the MyClientLive library to the targets dependencies.
And that’s it, you’re done! Your feature, built in isolation will use the lightweight implementation and give you control in tests and quick preview. On the other hand, building your app will automatically resolve to the live heavyweight dependency implementation and the app will perform the way it has to, when being run on the simulator or on a real device.
Thanks for your time. If you wish to take a closer look, I have prepared a Github project to complement this post.